-
- JimOrlando
- NASCAR Driver (Pro V)
-
- Posts: 2996
- Joined: 22 Nov 2014, 4:13 pm
 17 Jun 2022, 1:33 pm
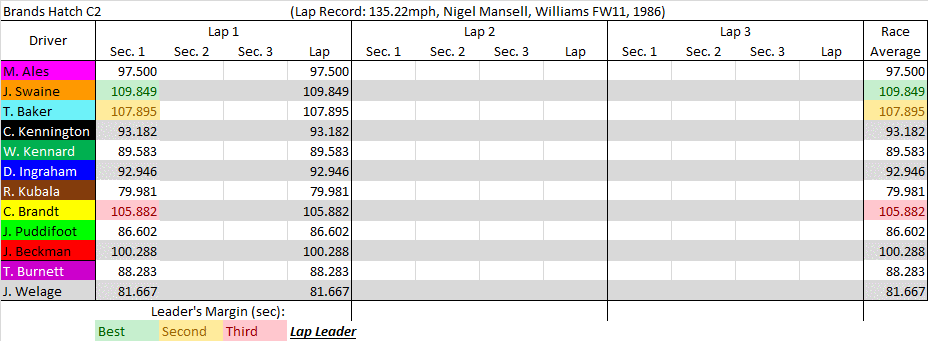
The lights are out and the race is on!
(Note: start speed pushes are in the chart. They will not be repeated here)
Turn 1 summary:
Swaine jumps out to the early lead dropping two wear around the inside of the first corner
Ales is into the corner on the inside at a safe 80mph
Baker fires off at 120, pushing his way past Ales on the inside shedding two wear in the process
Kennington drops to the inside lane at the start
Ingraham grabs the racing line at 80
Kennard tucks in behind Kennington at 60
Brandt takes off at 100 and picks up 3 positions right off the bat
Kubala stays inside and attaches himself to the green race car
Beckman catches the 7th place starting Kubala at 80
Puddifoot is happy to start at 20
Welage picks up a position at 60
Burnett also keeps at 20
Next deadline: turn 2 due Monday, June 20 at 4pm EDT/8pm UTC
-
 Viewed 2472 times")
-
- JimOrlando
- NASCAR Driver (Pro V)
-
- Posts: 2996
- Joined: 22 Nov 2014, 4:13 pm
20 Jun 2022, 1:21 pm
The field already begins to get single file
Turn 2 summary:
Swaine clears Druids on the inside at 80 shedding two wear
Baker rides the racing line at 100 dropping two wear
Ales follows the light blue machine also at 100 for the same two wear cost
Brandt careens around Paddock Hill Bend on the inside at 120 knocking off two wear
Ingraham leaves one wear on the racing line at 120
Kennington is distracted by a song on the radio, he does a safe 80 around the inside
Kennard was hoping for a slip but settles for following Kennington at 80
Beckman gets the initiative at 120 clipping off one wear on the line
Kubala is safe through the inside of Paddock Hill Bend at 80
Welage approaches the corner on the inside at 100
Puddifoot swings wide to catch the Paddock Hill line at 80
Burnett holds to the inside at 100
Next deadline: turn 3 due Wednesday, June 22 at 4pm EDT/8pm UTC
-
 Viewed 2452 times")
-
- JimOrlando
- NASCAR Driver (Pro V)
-
- Posts: 2996
- Joined: 22 Nov 2014, 4:13 pm
22 Jun 2022, 1:17 pm
Mixed strategies through Druids keeps the mid-pack intact
Turn 3 summary:
Swaine holds steady at 80 taking the Bend on the line for free
Baker finishes the Druids line at 100 and sheds one wear on the outside of the Bend
Ales continues in the tire tracks of Baker, he grabs the next racing line
Brandt swoops around the Graham Hill inside lane at 80 dropping two wear
Ingraham clears the corner on the racing line at 80 shedding one wear
Kennington outbrakes the blue machine into the inside lane for two wear and one position
Kennard makes up a length running the line at 100 knocking off two wear
Beckman is also two wear lighter after being forced outside at 100
Kubala starts the racing line into Druids at 80
Welage misreads the track, slowing to 60 for the inside of Paddock Hill Bend
Puddifoot is the benefactor of Welage's misread picking up two spots after leaving two wear on the line
Burnett scrubs off one wear around the inside at 100 to challengs for P11
Next deadline: turn 4 due Friday, June 24 at 4pm EDT/8pm UTC
-
 Viewed 2428 times")
-
- JimOrlando
- NASCAR Driver (Pro V)
-
- Posts: 2996
- Joined: 22 Nov 2014, 4:13 pm
24 Jun 2022, 1:24 pm
The field snakes through the corners but not without incident
Turn 4 summary:
Swaine jumps up to 120 and clears Surtees on the line for two wear
Baker finishes Graham Hill on the outside then dives inside approaching Surtees
Ales goes line to line at 80 for free
Brandt follows in the pink race car's tire tracks through Graham Hill
Kennington closes up on Brandt at 100 shedding one wear on the racing line
Ingraham starts at 100 then hits the brakes <CRUNCH> taking the racing line for free
Kennard maintains 100 finishing Druids then gets forced outside around the Bend
Beckman finishes the Druids 60s wear paid and starts the line behind the blue machine
Kubala taps the brakes to 60 and takes the racing line for free
Puddifoot slams into the inner 40s at 80 dropping two wear and outstripping Kubala
Burnett is even more aggressive taking the inside at 100 counting on his tires holding
Welage at 80 follows Kubala through the Druids racing line
Next deadline: turn 5 due Monday, June 27 at 4pm EDT/8pm UTC
-
 Viewed 2405 times")
-
- JimOrlando
- NASCAR Driver (Pro V)
-
- Posts: 2996
- Joined: 22 Nov 2014, 4:13 pm
27 Jun 2022, 1:20 pm
The leader stretches it out a bit. Two aggressive moves result in passes
Turn 5 summary:
Swaine pushes for 160 starting the Hawthorns line with a 4 carlength gap
Baker drops two wear on the inside of Surtees at 100
Ales takes the racing line at 100 for one wear
Brandt clears the corner on the line at 80 for free
Kennington attacks the inside of Surtees at 100 shedding two wear and moving up a spot
Ingraham knocks off one wear on the Surtees line at 100
Kennard finishes Graham Hill at 100 and starts the racing line behind the blue machine
Beckman at 120 takes the Bend racing line then sqeezes in front of Kennard for a total of four wear
Puddifoot cruises the Graham Hill racing line at speed
Burnett has to move to the outside of the corner for his 80 move
Kubala picks up one position on the line at 80
Welage finishes Druids at 80 and grabs the Graham Hill line
Next deadline: turn 6 due Wednesday, June 29 at 4pm EDT/8pm UTC
-
 Viewed 2379 times")
-
- JimOrlando
- NASCAR Driver (Pro V)
-
- Posts: 2996
- Joined: 22 Nov 2014, 4:13 pm
29 Jun 2022, 1:35 pm
More aggressive moves result in more jostling of positions
Turn 6 summary:
Swaine cruises the Hawthorns line at 120 for free
Baker makes up a length dropping one wear on the Hawthorns line at 140
Ales keeps pace also shedding one wear on the racing line
Kennington attacks the 120s at 160 knocking off two wear
Brandt exits Surtees at 140 and runs up Hawthorns Hill to start the line
Ingraham finishes the Surtees line at 100 and keeps inside
Beckman can accelerate to 140 passing the blue machine through Pilgrims Drop
Kennard leaves two wear on the Surtees line at 140 and challenges for P7
Puddifoot negotiates the Surtees line at 100 clipping one wear off his tires
Kubala starts at 120 then a hard brake and he dives to the inside of Puddifoot for P9
Burnett plots 120 and the outside is all that's open for his two wear
Welage runs the Graham Hill Bend line at 80 for free and sets up on the next line
Next deadline: turn 7 due Friday, July 1 at 4pm EDT/8pm UTC
-
 Viewed 2351 times")
-
- JimOrlando
- NASCAR Driver (Pro V)
-
- Posts: 2996
- Joined: 22 Nov 2014, 4:13 pm
29 Jun 2022, 2:04 pm
Starting out with a tight section of the track keeps the speeds down
-
-
- JimOrlando
- NASCAR Driver (Pro V)
-
- Posts: 2996
- Joined: 22 Nov 2014, 4:13 pm
01 Jul 2022, 1:04 pm
The first five get stretched out on the back of the course
Turn 7 summary:
Swaine, Baker, Ales and Kennington all plot 140, the last two wear paid in Hawthorns
Brandt runs the Hawthorns racing line at 120 for free
Beckman follows on at 120 also through the line
Kennard gets the initiative at 140 but the only choice at that speed is outside for one wear
Ingraham runs the line at 120 and maintains his position
Kubala pushes his engine to 160 and is up Hawthorn Hill grabbing the racing line
Puddifoot can reach 160 and drops to the inside of Kubala
Ingraham can accelerate to 140 for wear paid, finishing the Surtees 100s
Welage conserves his tires at 80 through the Surtees line
Next deadline: turn 8 due Wednesday, July 6 at 4pm EDT/8pm UTC
Monday, July 4 is Independence Day in the U.S. No turn is scheduled for that day. If
I have all moves by the usual deadline on Monday I will (likely) put the turn out.
There will be no reminder sent on Monday.
-
 Viewed 2326 times")
-
- JimOrlando
- NASCAR Driver (Pro V)
-
- Posts: 2996
- Joined: 22 Nov 2014, 4:13 pm
06 Jul 2022, 1:06 pm
Only one position change. The leader heads for the final corner of lap 1
Turn 8 summary:
Swaine hugs the inside of Stirlings at 100 shedding one wear
Baker drops two wear at 120 clearing the corner and making up a length
Ales at 140 approaches Stirlings on the inside
Kennington follows Ales also at 140
Brandt is around Westfield and though Dingle Dell at 140
Beckman also conserves wear at 140 through the corner
Ingraham grabs top gear and knocks off a wear at 160
Kennard maintains 140 and uses a slip to even up with Ingraham
Kubala attacks the Hawthorns line at 160 and carries into Westfield, three wear total
Puddifoot swings wide through Hawthorns at 120 saving tires
Burnett covers the racing line at 120
Welage at 140 grabs the start of the Hawthorns racing line
Next deadline: turn 9 due Friday, July 8 at 4pm EDT/8pm UTC
-
 Viewed 2289 times")
-
- JimOrlando
- NASCAR Driver (Pro V)
-
- Posts: 2996
- Joined: 22 Nov 2014, 4:13 pm
08 Jul 2022, 1:30 pm
One position change, 3-wide into Stirlings and a challenge for the lead
Turn 9 summary:
Swaine clears Clark Curve in the middle lane at 120 shedding one wear
Baker drops two wear on the inside at 120 and can accelerate behind the leader next turn
Ales is through the inside of Stirlings at 100 knocking off one wear
Kennington follows in Ales tire tracks also spending the wear
Brandt leaves two wear in Stirlings at 120 and tucks in behind the black machine
Beckman careens around the inside of Stirlings at 120 scrubbing off two wear as well
Kennard gets the initiative at 140 and keeps wide around Sheene's Curve
Ingraham keeps even with Kennard at 120
Kubala makes it 3-wide into Stirlings at 140
Puddifoot is through Westfield at 140 keeping to the inside
Burnett also takes the short route at 140
Welage rounds the Hawthornes line at 120 conserving wear
Next deadline: turn 10 due Monday, July 11 at 4pm EDT/8pm UTC
-
 Viewed 2273 times")
-
- JimOrlando
- NASCAR Driver (Pro V)
-
- Posts: 2996
- Joined: 22 Nov 2014, 4:13 pm
11 Jul 2022, 9:44 am
The leader pushes into lap 2, Clark Curve spreads the top 4
Turn 10 summary:
Swaine pushes his engine to 160 and it responds. He grabs the Paddock Hill Bend line
Baker comes off Clark Curve and heads for the start/finish line at 140
Ales sheds two wear around the inside of the final corner at 120
Kennington clears through the middle at 100 for free
Brandt follows the black machine through the middle lane at 100
Beckman is hard into the inside lane of Clark at 120 dropping two wear
Kubala is first out of the three-wide at 120 knocking off two wear around the inside
Kennard slows to 80 for free through Stirlings
Ingraham keeps even with Kennard at 80 around the inside
Puddifoot clears Stirlings on the inside at 80 for free
Burnett scrubs off one wear in the outside 80s at 100
Welage negotiates Westfield at 140 at no cost
Next deadline: turn 11 due Wednesday, July 13 at 4pm EDT/8pm UTC
-
 Viewed 2234 times")
-
- JimOrlando
- NASCAR Driver (Pro V)
-
- Posts: 2996
- Joined: 22 Nov 2014, 4:13 pm
13 Jul 2022, 12:56 pm
No positions change but a couple tighten up a bit
Turn 11 summary:
Swiane slows to 120 and drops one wear on the Paddock Hill Bend racing line
Baker clears the corner on the line at 120 shedding one wear
Ales grabs the line behind Baker making up a car length at 140
Kennington also makes up a car length at 160 following Ales on the line
Beckman acheives 160 and chooses to tuck in behind the black race car
Brandt at 140 makes it three-deep at the start/finish line
Kubala scrubs off one wear around the inside of Clark Curve at 100
Kennard starts the middle then shifts to the inside to clear at 100
Ingraham stays right beside Kennard at 100 through the middle lane
Puddifoot attacks the corner at 120 on the inside for two wear
Burnett finishes Stirlings at 100
Welage is around the inside of Stirlings at 80 continuing to conserve wear
Next deadline: turn 12 due Friday, July 15 at 4pm EDT/8pm UTC
-
 Viewed 2204 times")
-
- JimOrlando
- NASCAR Driver (Pro V)
-
- Posts: 2996
- Joined: 22 Nov 2014, 4:13 pm
15 Jul 2022, 1:07 pm
The wear numbers hit single digits for the front two
Turn 12 summary:
Swaine clears Druids on the line at 100 shedding two wear
Baker keeps pace at 100 for the same two wear cost
Ales drops one wear on the Paddock Hill Bend line at 120
Kennington dives inside through Paddock Hill at 120 dropping two wear
Beckman follows the black race car through the inside using a slip to pick up a position
Brandt also gets a bonus allowing him to clear Paddock Hill at 100 for free
Kubala maxes his acceleration to 140 and grabs the line into the corner
Ingraham get the jump out of Clark Curve at 160 and sets up for the next racing line
Kennard at 140 protects the inside but still has access to the Paddock Hill line
Puddifoot grabs top gear and evens up with Kennard on the outside
Burnett takes the inside of Clark Curve at 100 leaving one wear behind
Welage is one wear lighter on the inside also ready to accelerate off next turn
Next deadline: turn 13 due Monday, July 18 at 4pm EDT/8pm UTC
-
 Viewed 2168 times")
-
- JimOrlando
- NASCAR Driver (Pro V)
-
- Posts: 2996
- Joined: 22 Nov 2014, 4:13 pm
18 Jul 2022, 3:23 pm
Some mid-pack shuffling and quite a bit of wear used this turn
Turn 13 summary:
Swaine cruises into Graham Hill Bend on the line at 80
Baker finishes Druids line at 100 and picks up right behind the leader
Ales tucks in behind Baker after dropping two wear on the Druids line at 100
Beckman hugs the inside of the corner at 80 shedding two wear
Kennington clips one wear around the Druids line at 80
Brandt takes the short chute at 80 and starts the racing line into the next corner
Kubala runs the Paddock Hill Bend line at 120 knocking off one wear and moves to the inside
Ingraham keeps pace with the brown race car also at 120 for one wear through the line
Kennard wants the line at 140 but has to change quickly to the outside lane for two wear
Puddifoot uses the slip and one wear to run the inner 80 at 100 and takes two positions
Burnett starts the Paddock Hill racing line at 160
Welage prepares to follow the purple machine at 160
Next deadline: turn 14 due Wednesday, July 20 at 4pm EDT/8pm UTC
-
 Viewed 2126 times")
-
- JimOrlando
- NASCAR Driver (Pro V)
-
- Posts: 2996
- Joined: 22 Nov 2014, 4:13 pm
19 Jul 2022, 5:32 am
Beckman covers the field through sector 3
-